How to Light Up a Bathroom Mirror with LED Strips
Mirror lighting in a bathroom is not just about aesthetics. It solves a real practical problem: it provides even, shadow-free light that is essential for applying makeup, shaving, or styling your hair. Ceiling lights typically cast harsh overhead illumination that leaves your face unevenly lit. An LED strip running around the perimeter of your mirror fixes that problem — and looks great doing it.
In this article we cover which strip to choose for a wet room, how to install it properly, and which mistakes are worth avoiding.
Why a Bathroom Is a Special Case
The key difference between a bathroom and any other room is moisture. Steam from the shower, splashes near the sink, temperature fluctuations — all of this creates a harsh environment for electronics. Simply buying any LED strip and sticking it to your mirror will not work: without adequate protection it will fail quickly or become a safety hazard.
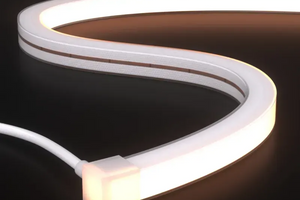
The critical specification here is the IP (Ingress Protection) rating. The minimum acceptable rating for a bathroom is IP44, which protects against water splashes from any direction. If the strip will be positioned close to a shower enclosure or above a sink, opt for IP65 or IP67. An IP65 strip is coated with a silicone lacquer; an IP67 strip is sealed inside a silicone tube. Both handle moisture well, but IP67 can withstand direct water exposure.
For most bathroom mirrors, IP65 is perfectly sufficient — it is flexible, adheres cleanly, and produces even light.
Choosing the Right Strip: Color Temperature and Power
For mirror lighting, color temperature is the most important characteristic. It is measured in Kelvin (K) and determines whether the light appears warm, neutral, or cool.
- 2700–3000 K — warm, yellowish light. Cozy atmosphere, but it distorts skin tones and colors. Not suitable for makeup.
- 4000–4500 K — neutral white. The best choice for a bathroom: easy on the eyes and renders colors accurately.
- 5000–6500 K — cool white or daylight. Good for maximum clarity, but can feel harsh in a relaxing environment.
If you plan to use the mirror for makeup, go with 4000–4500 K. This is the standard used in professional makeup studios.
In terms of power output, a strip rated at 7–10 W/m is well suited for mirror lighting. It provides bright but comfortable illumination. Higher-output strips (14–20 W/m) are typically used for general room lighting.
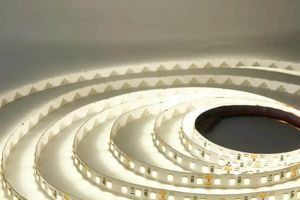
Also pay attention to LED density. A strip with 60 LEDs per metre produces much more uniform light without visible hot spots. A 30 LED/m strip can create a "string of beads" effect that looks unpolished up close.
Where to Position the Strip on the Mirror
There are several common placement approaches:
- Full perimeter — the most uniform result; the mirror becomes a stand-alone light feature in the room.
- Sides only — the classic vanity mirror layout; very effective at eliminating facial shadows.
- Top or bottom only — less functional but can work well as a decorative accent.
For a large rectangular mirror, lighting all four sides is the ideal solution. For a small round mirror, a continuous ring around the edge is enough.
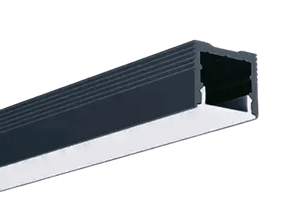
The strip is mounted either directly on the back face of the mirror (if the mirror stands proud of the wall) or inside an aluminium channel fixed to the wall behind the mirror. The channel diffuses the light and protects the strip from mechanical damage — it is the recommended approach.
Step-by-Step Installation
Before you start, gather everything you need: an LED strip with the correct IP rating, a 12 V or 24 V power supply, an aluminium channel with a diffuser cover, connecting wires, corner connectors (if you need to turn corners), and a dimmer switch or standard switch.
Step 1. Measure the mirror perimeter. Add 10–15 cm as a buffer. Cut the strip only at the marked cut lines — these appear every 2–5 cm depending on the model.
Step 2. Prepare the channel. Cut the aluminium channel to length and feed the strip inside. For corners, use dedicated corner connectors or carefully bend the channel if the profile allows it.
Step 3. Fix the channel to the wall. Secure it with wall plugs and screws or heavy-duty double-sided tape, depending on the weight. Position it so it is hidden behind the mirror edge.
Step 4. Connect the power supply. Calculate the required wattage: strip power (W/m) × length (m) × 1.2 (safety margin). For example, 2 m of 8 W/m strip needs a power supply of at least 20 W. Place the power supply outside the wet zone — inside a cabinet or behind a panel.
Step 5. Add a dimmer. A dimmer lets you adjust brightness to suit the time of day: brighter in the morning, softer in the evening. It is wired between the power supply and the LED strip.
Step 6. Test and finish. Switch on and check for dark sections, flickering, or uneven light. Once everything looks good, snap the diffuser cover into the channel.
Common Mistakes to Avoid
Wrong IP rating. A strip with no protection or only IP20 in a bathroom is a direct path to failure and potential short circuits. Always check the rating before purchasing.
Undersized power supply. Running a power supply at its maximum capacity causes it to overheat and shortens the life of the entire system. Always choose one with at least 20% headroom.
Strip without a channel. Gluing the strip directly to the wall or mirror without a channel results in uneven light and makes maintenance difficult. A channel looks cleaner and dissipates heat more effectively.
Cutting at the wrong point. Cutting the strip anywhere other than the marked cut line will leave some LEDs non-functional. Always cut only at the designated marks.
Conclusion
Installing LED strip lighting around a bathroom mirror is a project that any beginner can complete successfully. The essentials are straightforward: choose a strip with an IP65 rating, select a color temperature of 4000–4500 K, use an aluminium channel for a clean finish, and size your power supply with a proper safety margin.
The result is well worth the effort: smooth, flattering, shadow-free light will make everyday routines more comfortable, and your bathroom will gain a polished, intentional look.